centos7虚拟机安装elasticsearch5.0.x-安装篇
请预先安装jdk详细步骤
创建新用户(非root用户)
elasticsearch只能用非root启动,这里我创建了一个叫seven的用户
|
1
2
|
[root@localhost ~]# useradd seven
[root@localhost ~]# passwd seven
|
下载elasticsearch
|
1
2
3
4
5
|
[root@localhost ~]# su seven
[seven@localhost root]$ cd/home/seven
[seven@localhost ~]$ mkdirdownload
[seven@localhost ~]$ cddownload
[seven@localhost download]$ wget https://download.elastic.co/elasticsearch/release/org/elasticsearch/distribution/tar/elasticsearch/5.0.0-alpha3/elasticsearch-5.0.0-alpha3.tar.gz
|
解压并运行elasticsearch
解压
|
1
|
[seven@localhost download]$ tar-zxvf elasticsearch-5.0.0-alpha3.tar.gz
|
移动到指定文件夹并重命名(方便管理)
|
1
|
[seven@localhost download]$ mvelasticsearch-5.0.0-alpha3 /usr/java/elasticsearch
|
修改访问elasticsearch的IP及端口
|
1
|
[seven@localhost config]$ vim /usr/java/elasticsearch/config/elasticsearch.yml
|
找到如下代码段,并取消network.host及http.port所在行的注释,修改IP及端口
|
1
2
3
4
5
6
7
8
9
10
11
12
|
# ---------------------------------- Network -----------------------------------
#
# Set the bind address to a specific IP (IPv4 or IPv6):
#
network.host: 192.168.0.155
#
# Set a custom port for HTTP:
#
http.port: 9200
#
# For more information, see the documentation at:
#
|
直接运行bin/elasticsearch文件启动elasticsearch
|
1
2
|
[seven@localhost bin]$ cd/usr/java/elasticsearch/bin/
[seven@localhost bin]$ ./elasticsearch
|
启动时发现报错了。。。
|
1
2
3
4
5
6
7
8
9
10
11
12
13
14
15
16
17
18
19
20
21
22
23
24
25
26
27
28
29
30
31
32
33
|
[seven@localhost bin]$ ./elasticsearch
[2016-06-28 13:49:27,899][INFO ][node ] [Mondo] version[5.0.0-alpha3], pid[3671], build[cad959b/2016-05-26T08:25:57.564Z], OS[Linux/3.10.0-327.el7.x86_64/amd64], JVM[Oracle Corporation/JavaHotSpot(TM) 64-Bit Server VM/1.0_91/25.91-b14]
▽2016-06-28 13:49:27,900][INFO ][node ] [Mondo] initializing ...
[2016-06-28 13:49:28,941][INFO ][plugins ] [Mondo] modules [percolator, lang-mustache, lang-painless, ingest-grok, reindex, lang-expression, lang-groovy], plugins []
[2016-06-28 13:49:28,963][INFO ][env ] [Mondo] using [1] data paths, mounts [[/ (rootfs)]], net usable_space [15.7gb], net total_space [17.4gb], spins? [unknown], types [rootfs]
[2016-06-28 13:49:28,963][INFO ][env ] [Mondo] heap size [1.9gb], compressed ordinary object pointers [true]
[2016-06-28 13:49:31,980][INFO ][node ] [Mondo] initialized
[2016-06-28 13:49:31,980][INFO ][node ] [Mondo] starting ...
[2016-06-28 13:49:32,115][INFO ][transport ] [Mondo] publish_address {192.168.0.155:9300}, bound_addresses {192.168.0.155:9300}
Exception inthread "main"java.lang.RuntimeException: bootstrap checks failed
initial heap size [268435456] not equal to maximum heap size [2147483648]; this can cause resize pauses and prevents mlockall from locking the entire heap
max filedescriptors [4096] forelasticsearch process likely too low, increase to at least [65536]
please set[discovery.zen.minimum_master_nodes] to a majority of the number of master eligible nodes inyour cluster
max virtual memory areas vm.max_map_count [65530] likely too low, increase to at least [262144]
at org.elasticsearch.bootstrap.BootstrapCheck.check(BootstrapCheck.java:125)
at org.elasticsearch.bootstrap.BootstrapCheck.check(BootstrapCheck.java:85)
at org.elasticsearch.bootstrap.BootstrapCheck.check(BootstrapCheck.java:65)
at org.elasticsearch.bootstrap.Bootstrap$5.validateNodeBeforeAcceptingRequests(Bootstrap.java:183)
at org.elasticsearch.node.Node.start(Node.java:337)
at org.elasticsearch.bootstrap.Bootstrap.start(Bootstrap.java:198)
at org.elasticsearch.bootstrap.Bootstrap.init(Bootstrap.java:257)
at org.elasticsearch.bootstrap.Elasticsearch.init(Elasticsearch.java:96)
at org.elasticsearch.bootstrap.Elasticsearch.execute(Elasticsearch.java:91)
at org.elasticsearch.cli.SettingCommand.execute(SettingCommand.java:54)
at org.elasticsearch.cli.Command.mainWithoutErrorHandling(Command.java:91)
at org.elasticsearch.cli.Command.main(Command.java:53)
at org.elasticsearch.bootstrap.Elasticsearch.main(Elasticsearch.java:70)
at org.elasticsearch.bootstrap.Elasticsearch.main(Elasticsearch.java:63)
Refer to the log forcomplete error details.
[2016-06-28 13:49:32,144][INFO ][node ] [Mondo] stopping ...
[2016-06-28 13:49:32,198][INFO ][node ] [Mondo] stopped
[2016-06-28 13:49:32,198][INFO ][node ] [Mondo] closing ...
[2016-06-28 13:49:32,210][INFO ][node ] [Mondo] closed
|
于是我临时提高了vm.max_map_count的大小
*此操作需要root权限
|
1
|
[root@localhost ~]# sysctl -w vm.max_map_count=262144
|
查看修改结果
|
1
2
|
[root@localhost ~]# sysctl -a|grep vm.max_map_count
vm.max_map_count = 262144
|
或者永久性修改
|
1
2
3
4
5
6
7
8
9
10
11
12
|
[root@localhost ~]# cat /etc/sysctl.conf | grep -v "vm.max_map_count" > /tmp/system_sysctl.conf
[root@localhost ~]# echo "vm.max_map_count=262144" >> /tmp/system_sysctl.conf
[root@localhost ~]# mv /tmp/system_sysctl.conf /etc/sysctl.conf
mv:是否覆盖"/etc/sysctl.conf"? y
[root@localhost ~]# cat /etc/sysctl.conf
# System default settings live in /usr/lib/sysctl.d/00-system.conf.
# To override those settings, enter new settings here, or in an /etc/sysctl.d/ .conf file
#
# For more information, see sysctl.conf(5) and sysctl.d(5).
vm.max_map_count=262144
[root@localhost ~]# sysctl -p
vm.max_map_count = 262144
|
上面还有一个错误是关于jvm内存分配的问题heap size [268435456] not equal to maximum heap size [2147483648],需要修改的jvm配置
|
1
|
[seven@localhost bin]$ vim /usr/java/elasticsearch/config/jvm.options
|
将-Xmx2g改成-Xmx256m,也就是heap size [268435456] /1024/1024的值
又有新的错误。。。
|
1
2
3
4
5
6
7
8
9
10
11
12
13
14
15
16
17
18
19
20
21
22
23
|
Exception in thread "main" java.lang.RuntimeException: bootstrap checks failed
initial heap size [268435456] not equal to maximum heap size [2147483648]; this can cause resize pauses and prevents mlockall from locking the entire heap
max file descriptors [4096] for elasticsearch process likely too low, increase to at least [65536]
memory locking requested for elasticsearch process but memory is not locked
at org.elasticsearch.bootstrap.BootstrapCheck.check(BootstrapCheck.java:125)
at org.elasticsearch.bootstrap.BootstrapCheck.check(BootstrapCheck.java:85)
at org.elasticsearch.bootstrap.BootstrapCheck.check(BootstrapCheck.java:65)
at org.elasticsearch.bootstrap.Bootstrap$5.validateNodeBeforeAcceptingRequests(Bootstrap.java:183)
at org.elasticsearch.node.Node.start(Node.java:337)
at org.elasticsearch.bootstrap.Bootstrap.start(Bootstrap.java:198)
at org.elasticsearch.bootstrap.Bootstrap.init(Bootstrap.java:257)
at org.elasticsearch.bootstrap.Elasticsearch.init(Elasticsearch.java:96)
at org.elasticsearch.bootstrap.Elasticsearch.execute(Elasticsearch.java:91)
at org.elasticsearch.cli.SettingCommand.execute(SettingCommand.java:54)
at org.elasticsearch.cli.Command.mainWithoutErrorHandling(Command.java:91)
at org.elasticsearch.cli.Command.main(Command.java:53)
at org.elasticsearch.bootstrap.Elasticsearch.main(Elasticsearch.java:70)
at org.elasticsearch.bootstrap.Elasticsearch.main(Elasticsearch.java:63)
Refer to the log for complete error details.
[2016-06-28 14:55:49,770][INFO ][node ] [Goldbug] stopping ...
[2016-06-28 14:55:49,875][INFO ][node ] [Goldbug] stopped
[2016-06-28 14:55:49,875][INFO ][node ] [Goldbug] closing ...
[2016-06-28 14:55:49,887][INFO ][node ] [Goldbug] closed
|
这个问题折腾了我一下午,最后还是找到了解决方案,同样回到config/elasticsearch.yml文件,找到如下配置,开放discovery.zen.ping.unicast.hosts及discovery.zen.minimum_master_nodes
|
1
2
3
4
5
6
7
8
9
10
11
12
13
|
# --------------------------------- Discovery ----------------------------------
#
# Pass an initial list of hosts to perform discovery when new node is started:
# The default list of hosts is ["127.0.0.1", "[::1]"]
#
discovery.zen.ping.unicast.hosts: ["192.168.0.155"]
#
# Prevent the "split brain" by configuring the majority of nodes (total number of nodes / 2 + 1):
#
discovery.zen.minimum_master_nodes: 3
#
# For more information, see the documentation at:
#
|
然后修改max file descriptors [4096] for elasticsearch process likely too low, increase to at least [65536]这个错误(切换到root操作)
|
1
2
3
4
5
|
[root@localhost ~]# cp /etc/security/limits.conf /etc/security/limits.conf.bak
[root@localhost ~]# cat /etc/security/limits.conf | grep -v "seven" > /tmp/system_limits.conf
[root@localhost ~]# echo "seven hard nofile 65536" >> /tmp/system_limits.conf
[root@localhost ~]# echo "seven soft nofile 65536" >> /tmp/system_limits.conf
[root@localhost ~]# mv /tmp/system_limits.conf /etc/security/limits.conf
|
修改后重新登录seven用户,使用如下命令查看是否修改成功
|
1
2
|
[seven@localhost ~]$ ulimit-Hn
65536
|
接下来就可以启动elasticsearch了,启动完成使用浏览器访问http://192.168.0.155:9200
|
1
2
3
4
5
6
7
8
9
10
11
12
|
{
"name": "Vampire by Night",
"cluster_name": "elasticsearch",
"version": {
"number": "5.0.0-alpha3",
"build_hash": "cad959b",
"build_date": "2016-05-26T08:25:57.564Z",
"build_snapshot": false,
"lucene_version": "6.0.0"
},
"tagline": "You Know, for Search"
}
|


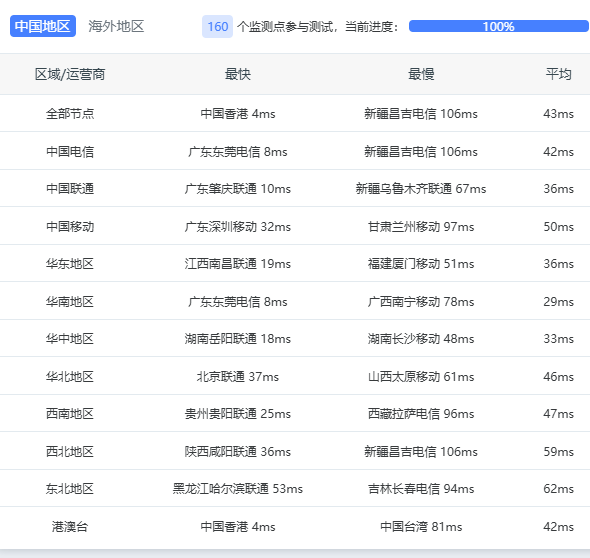 回国线路平均40ms左右,三网直连高峰期不跳线路!