目录
前言
在服务器上安装的各种中间件,一般都需要配置成开机自启动。但是有些中间件的安装过程中并没有提供相关配置开机自启动的说明文档。
今天总结一下Centos下配置服务开机自启动的3种方式。
一、Centos上配置开机自启动的几种方式
- 方式一:直接在/etc/rc.d/rc.local中添加服务启动命令
- 方式二:通过chkconfig配置服务自启动
- 方式三:Centos7通过systemctl enble配置服务自启动
二、实践演示
1. 在/etc/rc.d/rc.local中添加服务启动命令
/etc/rc.d/rc.local脚本会在Centos系统启动时被自动执行,所以可以把需要开机后执行的命令直接放在这里。
示例:配置开机启动apollo
vi /etc/rc.d/rc.local
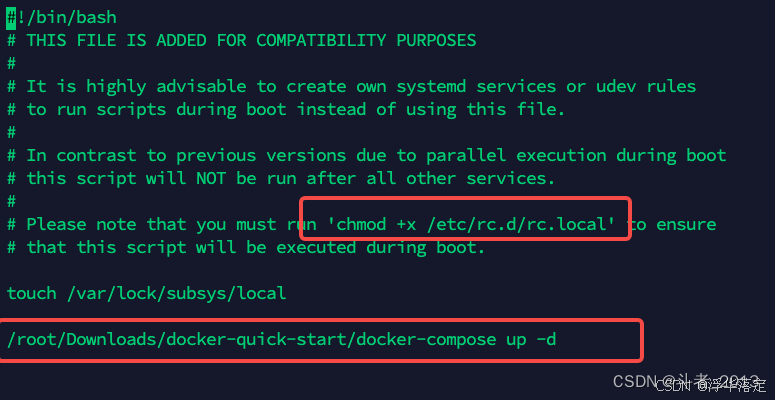
想简单点可以像上面这样直接将服务的启动命令添加到/etc/rc.d/rc.local中。
也可以自己编写服务启动的脚本。由于重启时是以root用户重启,需要保证root用户有脚本执行权限。
1)、编写服务启动的脚本
vi /opt/script/autostart.sh
#!/bin/bash
/root/Downloads/docker-quick-start/docker-compose up -d
2)、赋予脚本可执行权限(/opt/script/autostart.sh是你的脚本路径)
chmod +x /opt/script/autostart.sh
3)、打开/etc/rc.d/rc.local文件,在末尾增加如下内容
/opt/script/autostart.sh
4)、在centos7中,/etc/rc.d/rc.local的权限被降低了,所以需要执行如下命令赋予其可执行权限
chmod +x /etc/rc.d/rc.local
2. 通过chkconfig配置
在CentOS7之前,可以通过chkconfig来配置开机自启动服务。
chkconfig相关命令:
chkconfig –-add xxx //把服务添加到chkconfig列表
chkconfig --del xxx //把服务从chkconfig列表中删除
chkconfig xxx on //开启开机自动启动
chkconfig xxx off //关闭开机自动启动
chkconfig --list //查看所有chklist中服务
chkconfig --list xxx 查看指定服务
chkconfig运行级别level和启动顺序的概念:
chkconfig –list
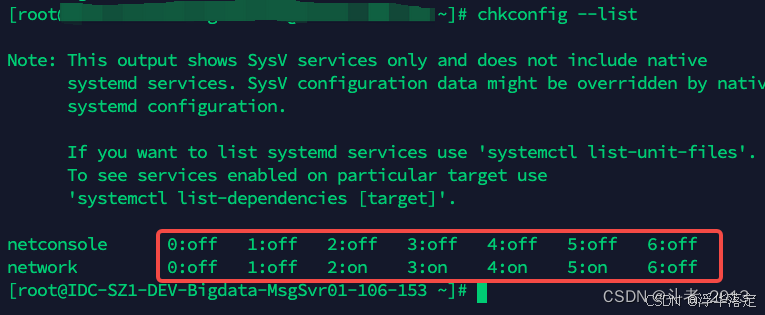
这里的0到6其实指的就是服务的level。
–level<等级代号> 指定系统服务要在哪一个执行等级中开启或关毕。
等级0表示:表示关机
等级1表示:单用户模式
等级2表示:无网络连接的多用户命令行模式
等级3表示:有网络连接的多用户命令行模式
等级4表示:不可用
等级5表示:带图形界面的多用户模式
等级6表示:重新启动
比如如下命令:
//设定mysqld在等级3和5为开机运行服务
chkconfig --level 35 mysqld on
//设置network服务开机自启动,会把2~5的等级都设置为on
chkconfig network on
表示开机启动配置成功。

服务的启动顺序又指的什么呢?
服务的启动顺序是指在服务器启动后服务启动脚本执行的顺序。
以系统默认服务network说明:
cat/etc/init.d/network
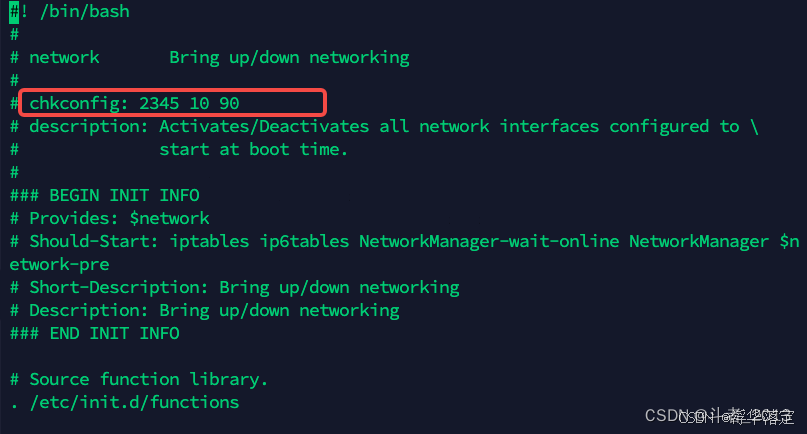
其中 # chkconfig: 2345 10 90用来指定服务在各个level下的启动顺序。
该配置的含义是network服务在2、3、4、5的level下的启动顺序是10,在1和6的level等级下的启动顺序是90。
chkconfig配置的服务启动顺序最后都会在/etc/rc.d/目录下体现出来:
cd /etc/rc.d/
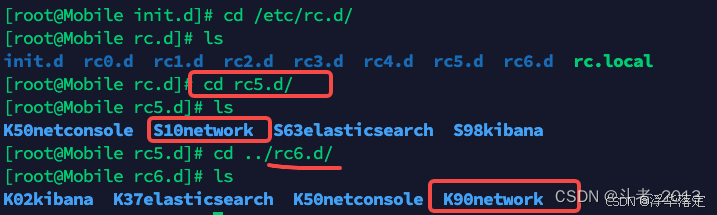
文件中脚本命名规则,首字母K表示关闭脚本,首字母S表示启用脚本,数字表示启动的顺序.
chkconfig配置实例
通常kibana的官方配置是没有介绍如何配置开机自启动的。这里我配置kibana开机自启动来说明。
1、在/etc/init.d目录下,新建脚本kibana
cd /etc/init.d
vi kibana
脚本内容如下:
#!/bin/bash
# chkconfig: 2345 98 02# description:
kibana
KIBANA_HOME=/usr/local/kibana-6.2.4-linux-x86_64
case $1 in
start)
$KIBANA_HOME/bin/kibana &
echo"kibana start"
;;
stop)
kibana_pid_str=`netstat -tlnp |grep 5601 | awk '{print $7}'`
kibana_pid=`echo ${kibana_pid_str%%/*}`
kill-9 $kibana_pid
echo"kibana stopped"
;;
restart)
kibana_pid_str=`netstat -tlnp |grep 5601 | awk '{print $7}'`
kibana_pid=${kibana_pid_str%%/*}
kibana_pid=`echo ${kibana_pid_str%%/*}`
kill-9 $kibana_pid
echo"kibana stopped"
$KIBANA_HOME/bin/kibana &
echo"kibana start"
;;
status)
kibana_pid_str=`netstat -tlnp |grep 5601 | awk '{print $7}'`
if test -z $kibana_pid_str; then
echo"kibana is stopped"
else
pid=`echo ${kibana_pid_str%%/*}`
echo"kibana is started,pid:"${pid}
fi
;;*)
echo"start|stop|restart|status"
;;
esac
注意️:
每个被chkconfig管理的服务需要在对应的init.d下的脚本加上两行或者更多行的注释。
第一行告诉chkconfig缺省启动的运行级以及启动和停止的优先级。如果某服务缺省不在任何运行级启动,那么使用 – 代替运行级。
第二行对服务进行描述,可以用\ 跨行注释。
#!/bin/bash
#chkconfig:2345 98 02
#description:kibana
解释说明:
配置kibana服务在2、3、4、5的level等级下脚本执行顺序是98,
6的level等级下脚本执行顺序是01。
增加脚本的可执行权限
chmod +x kibana
3.查看chkconfig list
chkconfig --list
4.把服务添加到chkconfig列表
chkconfig --add kibana

设置kibana服务自启动
chkconfig kibana on //开启开机自动启动
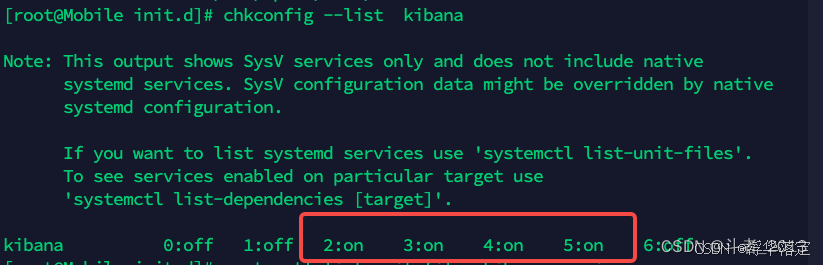
查看kibana服务自启动状态
chkconfig --list kibana
如果2~5都是on,就表明会自动启动了
服务的启动、停止、重启和状态查看
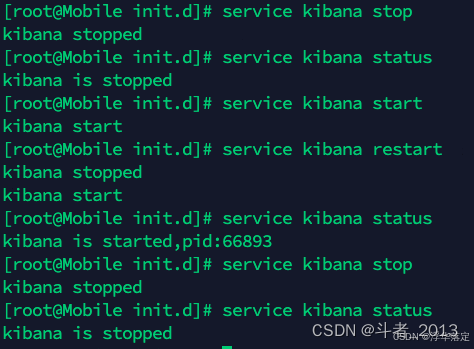
//查看服务状态
service kibana status
//服务启动
service kibana start//服务停止
service kibana stop
//服务重启
service kibana restart
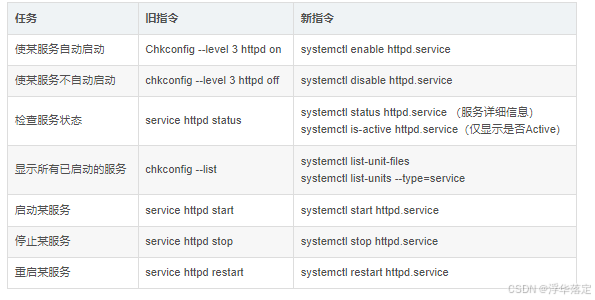
3 Centos7通过systemctl enble配置服务自启动
在Centos7后,更推荐通过systemctl来控制服务。
systemctl服务的目录介绍
知道服务的管理是通过 systemd,而 systemd 的配置文件大部分放置于 /usr/lib/systemd/目录内。但是 Red Hat 官方文件指出, 该目录的文件主要是原本软件所提供的设置,建议不要修改!而要修改的位置应该放置于 /etc/systemd/system/目录内。
详情查看:17.3 systemctl 针对 service 类型的配置文件 | 鸟哥的 Linux 私房菜:基础学习篇 第四版
Centos 系统服务脚本目录:
/usr/lib/systemd/
有系统(system)和用户(user)之分,如需要开机没有登陆情况下就能运行的程序,存在系统服务(system)里,即:
/usr/lib/systemd/system/
反之,用户登录后才能运行的程序,存在用户(user)里,服务以.service结尾。
/usr/lib/systemd/user/
建立kibana开机服务
1)、建立kibana服务文件
cd /etc/systemd/system/
vim kibana.service
脚本内容:
[Unit]
Description=kibana
After=network.target
[Service]
Type=forking
User=root
Group=root
ExecStart=/etc/init.d/kibana start
ExecReload=/etc/init.d/kibana restart
ExecStop=/etc/init.d/kibana
stop
PrivateTmp=true
[Install]
WantedBy=multi-user.target
注意️:
这里ExecStart、ExecReload、ExecStop的命令还是借助了上文在/etc/init.d目录下配置kibana脚本来实现。
[Service]的启动、重启、停止命令全部要求使用绝对路径
[Install]服务安装的相关设置,可设置为多用户
参数说明:
Description:描述服务
After:描述服务类别
[Service]服务运行参数的设置
Type=forking是后台运行的形式
User 服务启动用户
Group 服务启动用户组
ExecStart 为服务的具体运行命令
ExecReload 为重启命令
ExecStop 为停止命令
PrivateTmp=True表示给服务分配独立的临时空间
2)、赋予执行权限
chmod 754 kibana.service
依照上面的表格,权限组合就是对应权限值求和,如下:
7 = 4 + 2 + 1 读写运行权限
5 = 4 + 1 读和运行权限
4 = 4 只读权限.
这句命令的意思是将filename文件的读写运行权限赋予文件所有者,把读和运行的权限赋予群组用户,把读的权限赋予其他用户。
3)、服务的启动、停止、开机启动
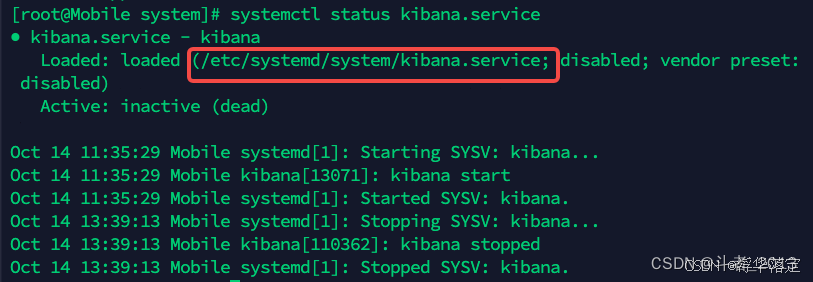
查看服务状态
//重新加载某个服务的配置文件,如果新安装了一个服务,归属于 systemctl 管理,要是新服务的服务程序配置文件生效,需重新加载
systemctl daemon-reload
//查看服务状态
systemctl status kibana.service
启动服务
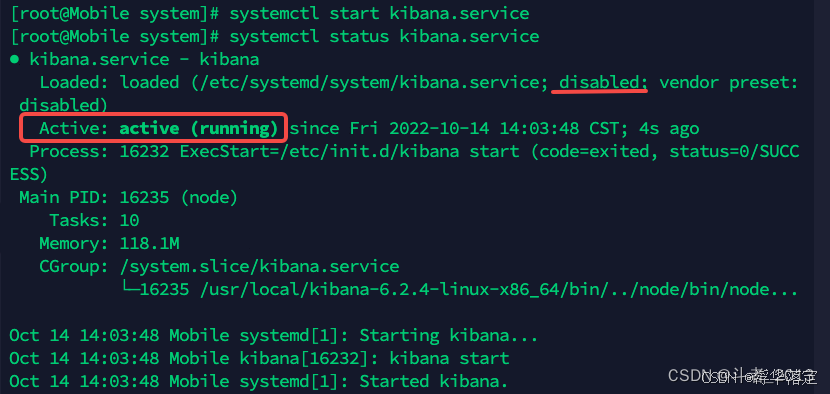
其中,disabled说明服务还没有开启开机自启动。
开启服务开机启动
systemctl enable kibana.service
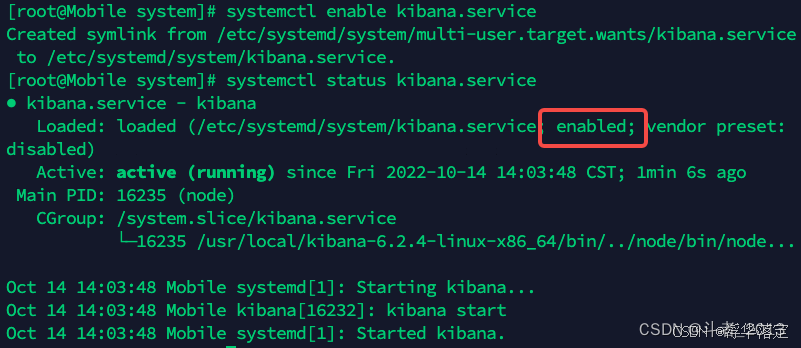
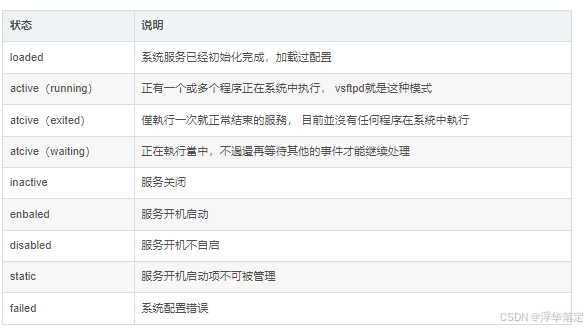
服务状态说明:
systemctl status 服务名称
常用服务文件
nginx.service
[Unit]
Description=nginx - high performance web server
After=network.target remote-fs.target nss-lookup.target
[Service]Type=forking
ExecStart=/usr/local/nginx/sbin/nginx -c /usr/local/nginx/conf/nginx.conf
ExecReload=/usr/local/nginx/sbin/nginx -s reload
ExecStop=/usr/local/nginx/sbin/nginx -s stop
[Install]
WantedBy=multi-user.target
mysql.service
[Unit]
Description=mysql
After=network.target remote-fs.target nss-lookup.target
[Service]Type=forking
ExecStart=/usr/local/mysql/support-files/mysql.server start#ExecReload=/usr/local/mysql/support-files/mysql.server restart#ExecStop=/usr/local/mysql/support-files/mysql.server stop#PrivateTmp=true
[Install]
WantedBy=multi-user.target
redis.service
[Unit]
Description=Redis
After=network.target remote-fs.target nss-lookup.target
[Service]Type=forking
ExecStart=/usr/local/bin/redis-server /etc/redis.conf
ExecStop=kill-INT `cat/tmp/redis.pid`
User=www
Group=www
[Install]
WantedBy=multi-user.target
supervisord.service
[Unit]
Description=Process Monitoring and Control Daemon
After=rc-local.service
[Service]Type=forking
ExecStart=/usr/bin/supervisord -c /etc/supervisord.conf
SysVStartPriority=99
[Install]
WantedBy=multi-user.target
总结


 回国线路平均40ms左右,三网直连高峰期不跳线路!